Risk Inquiry with Kount
Overview
Integrating with the New Moneris API endpoints for Kount involves use of the Kount Data Collector to provide data for the risk assessment before making API calls to Moneris.
1. Getting Started
Integrating with the New Moneris API endpoints for Kount involves use of the Kount Data Collector to provide data for the risk assessment before making API calls to Moneris. After data collection, your solution may choose to call the POST Create Kount Inquiry before or after the financial transaction.
2. Boarding for Kount
Test Credentials for Kount Essentials
All Moneris sandbox accounts have access to test the Kount Essential solutions and do not require special boarding processes. Follow these easy steps to modify your /kount-inquiries API calls for testing.
- Include the values in the aside in your test calls for the /kount-inquiries fields:
- Use the OAuth credentials and test information provided within your Moneris Developer Portal account.
Values
kountAccountID760000
kountApiKeyeyJ0eXAiOiJKV1QiLCJhbGciOiJIUzI1NiJ9.eyJpc3MiOiI3NjAwMDAiLCJhdWQiOiJLb3VudC4xIiwiaWF0IjoxNTU4MDQwODQ5LCJzY3AiOnsia2EiOm51bGwsImtjIjpmYWxzZSwiYXBpIjp0cnVlLCJyaXMiOnRydWV9fQ.y3_2yzd11-Y_F6_xzVsXI-NO1a7P6ldMjDnKzl5yBko
websiteIDBASIC1
Test Credentials for Kount Enterprise
To test Kount Enterprise in your solution you will require test credentials specific to your risk management portfolio. Consult your Kount Client Success Manager.
- Include the values in the aside in your test calls for the /kount-inquiries fields:
- Use the OAuth credentials and test information provided within your Moneris Developer Portal account.
Values
kountAccountIDprovided by Kount Client Success Manager
kountApiKeyprovided by Kount Client Success Manager
websiteIDprovided by Kount Client Success Manager
Production Credentials for Kount Essential
For merchants using the Moneris Kount Essential solution please e-mail [email protected] to obtain your production kountAccountID , kountApiKey and websiteID credentials.
Production Credentials for Kount Enterprise
For merchants using the Moneris Kount Enterprise solution please consult your Kount Client Success Manager to obtain your production kountAccountID, kountApiKey and websiteID credentials.
3. Kount Data Collector
The Data Collector process provides data related to the device initiating the transaction, and runs in the background while the webpage loads in a client browser or mobile application. The data collected is used in conjunction with the Kount Risk Inquiry data.
Data Collector Process Flow - Kount
- Customer browses to merchant order form page containing Data Collector code
- Customer browser/mobile application automatically requests redirect on the Data Collector element
- Customer browser is redirected to Kount servers
- Kount collects device attributes
- Kount directs customer browser to display static image hosted by merchant
Data Collector – In-App SDKs
Kount offers implementation of their Data Collector service in both mobile devices and web browsers. Kount has native Mobile SDKs for both iOS and Android to collect more data and increase reliability of the Device ID across the life of a customer’s device.
iOS SDK
Installing & Configuring the SDK, and Samples.
Android SDK
Installing & Configuring the SDK, and Samples.
Data Collector – Web Integration
Kount web integration involves downloading the Kount Device Data Collection SDK dynamically to be used on the webpage. The Javascript samples for integration and the necessary steps to follow are provided below.
Data Collector Process Requirements.
- Port 443 must be available to post and receive data from Kount
- The code can be inserted anywhere on the webpage prior to submission of the order. For faster results you should place this code at the top of the html page coding.
- Session ID
The Session ID is the unique identifier for the collection event and is specific to the user’s request. You will use the Session ID for subsequent calls to the Inquiry Service
Session ID Requirements
- Session IDs must be unique per request. They must be unique for a minimum of 30 days.
- Session ID must contain only alphanumeric characters (0-9, a-z or A-Z), dashes (-) or underscores (_).
- Session ID values should be 32 characters in length. Session ID values of less than 32 characters will be accepted, but it is strongly recommended to use a 32 character value.
Implementation Details
We advise that you create a the session id that is sent over to Kount and this is accomplished by creating the session ID that meets the criteria described below and including that in the call to download the Device Data Collection SDK (web implementation only). Assuming the session ID used in this example is abcdefg12345abababab123456789012, the call to download the SDK looks like this:
<script>
type='text/javascript'src='https://DATA_COLLECTOR_URL/collect/sdk?m=123456&s=abcdefg12345abababab123456789012'>
</script>
Web Client and Browser Set Up
1. Download the Kount Device Data Collection SDK
The Kount Device Data Collection SDK is hosted by Kount, and needs to be downloaded dynamically to be used on a web page.
The following code can be used to download the SDK:
<script>
type='text/javascript'src='https://DATA_COLLECTOR_URL/collect/sdk?m=123456&s=abcdefg12345abababab123456789012'>
</script>| Variable Name | Definition |
|---|---|
| m | Six digit Merchant ID number issued by Kount |
| s | 32 character session ID Exclude this parameter from the call to the download of the SDK to have Kount generate a session ID for you. |
| DATA_COLLECTOR_URL | The URLs for the Data Collector are Environment specific. There is a URL for Test and a URL for Production |
DATA_COLLECTOR URL:
Sandbox :
Production :
2. Content Security Policy
If your organization has instituted a Content Security Policy on your website that interferes with the execution of the Device Data Collection on your site, you will need to add this to your page.
3. Configure the Trigger
The Device Data Collector SDK collection process is triggered asynchronously by the ‘load’ data-event. This gives the collector the most available time to complete its work. The collection is bound to the page load event by adding the kaxsdc class and data-event=‘load’ to an HTML element, such as the HTML body or a div. It looks something like this:
4. Configure the Client
The Kount collector JavaScript is namespaced under the ka JavaScript object. It is required to have the above /collect/sdk script tag added to your page, which will import the Device Data Collector SDK.
To start using the Device Data Collector SDK:
- Create a new ClientSDK object
- Optionally Setup Callback Methods
var client = new ka.ClientSDK();The SDK provides a client programmable callback system that allows the client to execute custom code at certain points in the data collection process. This method allows a merchant to add a callback function to be called at a specified life-cycle hook. A merchant can pass a JavaScript object containing one or more life cycle hooks with a function pointer or an anonymous function to be executed.
List of hooks (In order of firing):
- collect-begin - Triggers when the collection starts
- collect-end - Triggers when the collection ends
When executed, the callback function is passed a JavaScript object containing the following properties:
- MercSessId – The session ID used in the collection
- MerchantId – The merchant Id
client.setupCallback(
    {
        'collect-end':
            function (params) {
                loginButton = document.getElementById('login_button');
                loginButton.removeAttribute('disabled');
            },
        'collect-begin':
            function (params) {
                var loginForm = document.forms ['loginForm'];
                var input = document.createElement('input');
                input.type='hidden'%;
                input.name = 'kaId';
                input.value = params['MercSessId'];
                loginForm.appendChild(input);
            }
    }
Auto Load Events
Call the autoLoadEvents method on the client to attach the collection process to be automatically triggered by the page elements load event with the className “kaxsdc" configured in Step 3.
client.autoLoad Events ();Code Example
This code is an example of where each of the components discussed above appear in the web page. Use this example to help you understand where to best integrate into your website.
NOTE
It is recommended that the Data Collector code exist at the top of the page load so it has adequate time to run before a user finishes their interaction with the webpage.
<html>
    <head>
    </head>
        <!-- Adding the data-event-load to the class kaxsdc will start the client in the autol Note this may be added to different data elements like a div -->
        <body class='kaxs dc' data-event='load'>
        <!-- Get the Collector SDK. In the example, DATA COLLECTOR_URL', 'm=123456' and s=abcdefg12345 abababab123456789012 are placeholder values. Both DATA_COLLECTOR_URL and the "m" values will be supplied by your Kount Client Success Manager. The "s" value will be the dynamic session of your customer and should be a variable representing the customer's current session ID. If this parameter is excluded, the SDK will generate a session ID for you. -->
        <script type='text/javascript' src='https://DATA_COLLECTOR_URL/collect/sdk?m=123456&s=abcdefg12345 abababab123456789012'></script>
        <!-- The following script starts the ClientSDK for the collection.-->
        <!-- You may optionally setup callbacks for the collect-begin and the collect-ends events. These callbacks can be useful if a business wants to be sure know that a risk evaluation is being made with or without a complete set of information)-->
        <script type='text/javascript'>
            var client=new ka.ClientSDK();
            // OPTIONAL
            client.setupCallback(
            {
                // fires when collection has finished - this example would not enable the // login button until collection has completed
                'collect-end':
                    function (params) {
                        // enable login button
                            loginButton = document.getElementById('login_button ');
                            loginButton.removeAttribute('disabled');
                            // now user can login and navigate away from the page
                    }
                            // fires when collection has started.
                            'collect-begin':
                                function (params) {
                                // add hidden form element to post session id var loginForm = document.forms ['loginForm']; var input =document.createElement('input'); input.type = 'hidden';
                                input.name = 'kaId';
                                input.value = params['MercSessId']; loginForm.appendChild(input);
                            }
                }
            );
                //END OPTIONAL SECTION
                // The auto load looks for an element with the 'kaxsdc' class and
                // data-event equal to a DOM event (load in this case). Data collection begins // when that event fires on that element--immediately in this example
                client.autoLoadEvents();
        </script>
        </body>
</html>
4. Kount Risk Inquiry
During the customer’s checkout experience in your app or website, the merchant server may perform a POST Create Kount Inquiry to generate the risk inquiry. Moneris will connect to the Kount Risk Inquiry Service and provide the data from this API call to Kount to generate the risk assessment.
See our API Reference for full details, but ensure to include the following:
- sessionID must match the value you created for this customer’s Data Collector process earlier. This links the data collected by Kount directly to your subsequent API call.
On receiving your response for the POST Create Kount Inquiry, you solution will need to perform light response handling beyond the HTTP Status Code return by our API. Your solution
-
kountResult will return Kount’s suggested Auto Decision for the risk assessment. Transactions with a value of APPROVED have received a successful risk scoring for the merchant portfolio, while DECLINED or REVIEW indicate that the transaction’s risk is too high to continue.
-
fraudScore will return Kount’s Omni Score from the risk assessment. For Kount Enterprise merchants, this may be useful in testing and troubleshooting the risk portfolio established with your Kount Client Success Manager.
Perform Risk Inquiry Before or After Payment?
A risk inquiry request can be performed either before or after a customer payment transaction. When used before the payment, the risk scoring is less complete as some important details cannot be collected, but using a risk inquiry after the payment can add additional friction for the customer experience.
Best practice involves utilizing our Validations resource within the Moneris API. Moneris recommends first performing a POST Create Validation to quickly check CVD and AVS prior to calling Kount, which will allow you to supply the results from each tool to your Kount risk assessment.
For merchants planning to use Kount Risk Inquiry after the payment instead, Moneris recommends adding automation to your solution for validating the risk scoring result and cancelling successful payments as Kount suggests with a DECLINED kountResult. You may also wish to implement manual review processes or cancel transactions with a REVIEW kountResult.
5. Proceed with Payment
Finally, the merchant can process their financial transaction via POST Create Payment Method . Use our API Reference for full details and consult either of the following processes:
Proceeding with Payment
6. Validate Order Data (Kount Enterprise only)
Moneris Kount Enterprise Test Script
It is recommended that you use test scripts to validate data is coming to Kount as expected and to prove out expected actions within your order management system based on the response or reply from Kount. - replace for first segment.
Below are some examples and actions you may wish to undertake to validate your data submission and the actions within Kount and your systems based upon the Kount responses. These are all optional, but highly recommended.
While some of these examples are for how to set up items in the system, others are recommendations of order details to submit to test functionality and set up.
Here is a list of the items we recommend you test and set up:
1. Create and verify UDFs
For merchants who intend to pass additional data into Kount in the form of a User Defined Field (UDF) you must create appropriate "label" entries in the Kount Agent Web Console (AWC).

To create a UDF, do the following:
- In the Agent Web Console (AWC), click the Fraud Control tab, and then click User Defined Fields.
- On the User Defined Fields page, in the lower right, click Add UDF.
- In the Add UDF box, enter the name of the UDF in the Label text box. A label can be a maximum of 28 characters and the first character must be a letter.
- Type a description in the Description field.
- Select Number, Alpha-Numeric, Date, or Amount from the Type drop-down menu. Note: UDFs intended for use in a VIP list must be alpha-numeric.
- Click Save UDF.

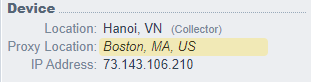
2. Device Data Collection
The Risk Inquiry Service (RIS) joins device data provided from the data collector process with the customer order data sent from the merchant. Once the device data and the order data are combined, RIS evaluates and scores each transaction.
It should be verified below, on the transaction details page, that the device data collector is functioning properly and that a unique session ID is being passed to Kount in each Risk Inquiry.
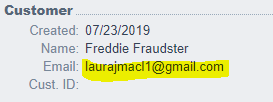
3. Customer Email Address
Verify that you can view the customer’s email address on the Transaction Details Page.
Note: For those instances when you do not have a valid email, you will be [email protected] and you will not see any value displayed. Otherwise, you would see the email as shown below.
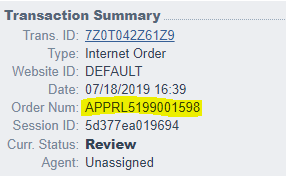
4. Merchant Order Number
Verify that you can view merchant’s internal order number on the Transaction Details Page
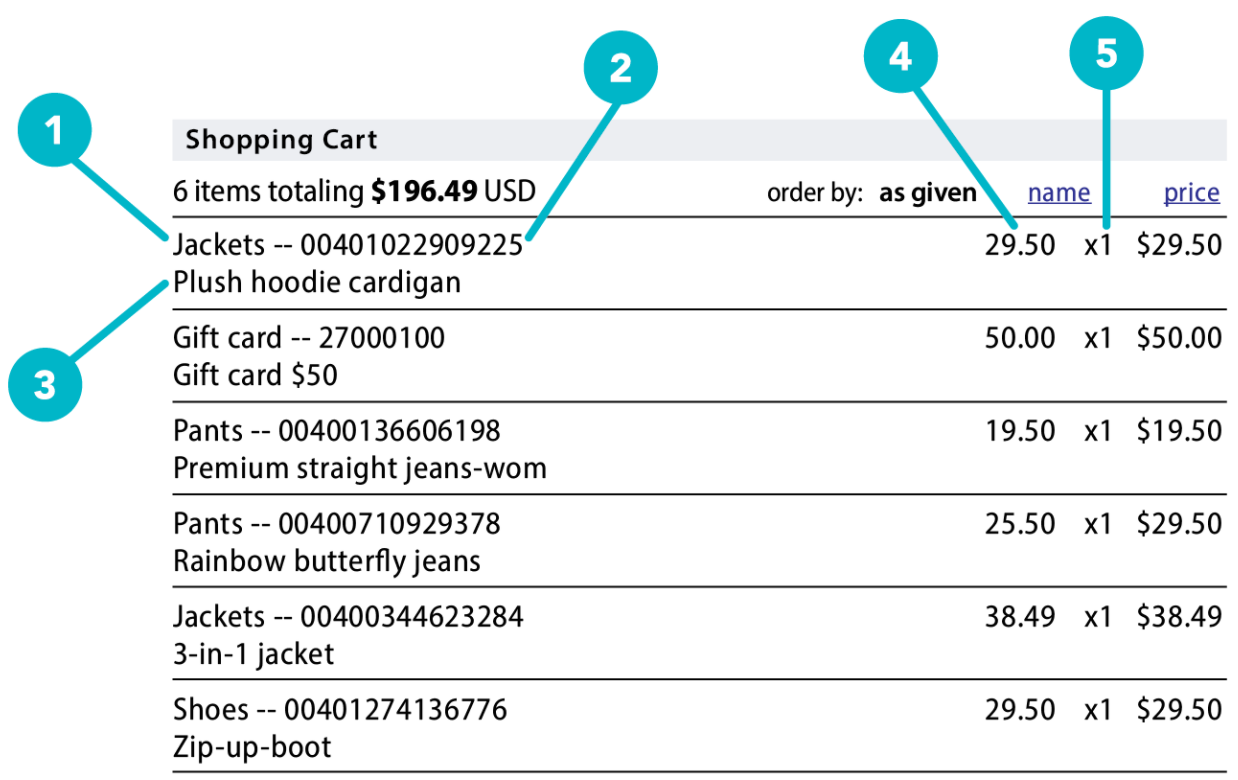
5. Shopping Cart Information
Shopping Cart details are required in Kount. Below is a checklist of shopping cart required fields that should be verified as displaying correctly in the Transaction Details Page of your Agent Web Console.
- Product_Type
- Item_Type
- Description
- Price
- Units
- Total Amount
This bulleted list corresponds with the screenshot.
- PROD_TYPE should be a High-level description of the item and can be used in rules.
- PROD_ITEM is Typically the SKU number for the item and can be used in rules.
- PROD_DESC is Specific description of the item, can be lengthy and descriptive but is not available for triggering rules.
- PROD_PRICE is the price per item
- PROD_QUANT is the quantity of items
NOTE:
the double hyphen “--“ between PROD_TYPE and PROD_ITEM is a formatting separator that Kount inserts and should not be placed in data sent or rule conditions.
6. Address and Phone
Verify on the Transaction Details page those Billing and Shipping address fields you’re able to send to Kount. For distance calculations and for address verification services (when applicable), both the two-digit ISO country code and respective postal code are required.
Billing
Street Address, City, State, Postal Code, Country, Billing Phone
Shipping
Street Address, City, State, Postal Code, Country, Billing Phone

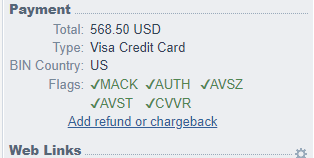
7. Payment information
Payment information will be crucial for your overall successful utilization of Kount. Kount offers multiple payment methods and we suggest you submit Test transactions with all which are relevant to your business, verifying the following in the Transaction Details Page of your Agent Web Console:
- Total of order in currency purchased (currency code will be displayed)
- Total in your base currency (currency code will be displayed)
- Payment Type (correct payment type is being shown)
- Sending raw card data to the SDK for Hashing (the Kount SDK will hash the raw card number for PCI compliance) – verify that you can view the Bin Country
- Bin and Bin Country (these will be ‘unknown’ for AMEX and Discovery cards)
- AUTH flag must be set to green on transactions before certification
8. Test VIP List Changes
Follow these actions to prove out workflow or expected actions within your Order Management System (OMS) based on response or reply from Kount.
-
Add [email protected] email address to the VIP Approve list in the Test environment.
-
Add [email protected] email address to the VIP Decline list in the Test environment.
-
Add [email protected] email address to the VIP Review list in the Test environment.
-
Place a test order using any item via the front end of the test website.
- When filling out the customer information, use [email protected] as the email address.
- Fill in necessary Test Credit Card information.
-
Confirm that after the order has been placed, the proper customer experience message displays.
-
Confirm the message appears as approved, declined, or under review, respectively, in the Agent Web Console (AWC).
-
Repeat with other two emails to force the respective response.
Additional Optional Test Scenarios
Scenario | Instructions |
|---|---|
Shipping or Billing Address |
|
Shipping or Billing Phone |
|
Order Number |
|
Additional Information
Learn more with the API Definitions
Peruse the endpoints, request/response formats, and authentication methods covered in this scenario.
Updated 14 days ago